Camera-scanning 120 negatives
Posted: August 27, 2015 Filed under: Camera-scanning, Miscellany, Rolleicord III | Tags: 120 film, analogue photography, black & white film, camera scan, cameras, classic cameras, dslr scanning, film photography, home developing, home scanning, Nikkor, photography, Rolleicord 12 CommentsI recently posted photos that I had shot on black and white 120 film, home processed, and ‘scanned’ using my Fuji X-T1 camera and an old Nikkor macro lens. I’ll detail a little bit of the process below, because I think this holds great promise of being a quick and easy way to get some really nice quality scans. Below is a screen shot of a detail area from the photo above, to give you some idea of the quality and resolution.
When cropped square, these images are about 3100 x 3100 pixels. The X-T1 has about a 16MP sensor in it, and the full image size is 3264 x 4896 pixels. I didn’t completely fill the frame with the negative, so I’m cropping in a bit (plus cropping square of course in this case, since they’re 6×6 negs). I could make higher-resolution images of 120 film by getting closer to the neg and moving it around to capture several images, then auto-stitching them in Photoshop. I’ve seen examples of this online that are stunning. But for quick scans, these 9+MP images are pretty great.
So, how was this done?
First I bought a small light box to act as a backlight-source. I got a Logan 4″ x 5″ Slim Edge Light Pad, but I’m sure any would work fine. I had read that this model has a nice consistent brightness and color. And I wanted one for some other uses, anyway.
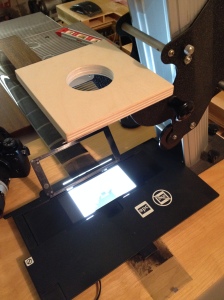
Then I had to figure out a way to hold the camera perfectly parallel to the light box. A tripod could be used, but it would be hard to align it perfectly, and to adjust height and repeat the setup. I tried this with a tripod in the past, and it’s a pain in the a**. An old copy stand would be perfect, but I had a hard time finding one for a reasonable price. So I decided that an old photo enlarger could be converted to a copy stand. I picked up an old Omega enlarger at a thrift store for $16:
It seemed a shame to tear apart such a nice enlarger, but I found that it could easily be dismantled in a way that it could be put back together if I want to return it to it’s intended use.
I added a small platform of plywood, with a hole cut at the perfect size to hold the end of my Nikkor macro lens. This certainly wouldn’t work with all lenses, but the way this lens is built (and since the Fuji X-T1 is a very light camera), it works perfectly. I used a level to carefully align the platform to be near-perfectly level with the base of the enlarger (fortunately, the enlarger had adjustment screws on the base that normally holds the neg-carrier, to make this adjustment easy).
I used a neg carrier that I happened to have from a flatbed scanner to hold the negatives flat against the light box, and inserted the camera and lens into the platform:
It may look a bit unstable, but the camera actually sits very steady, since the camera body is light, and the lens is heavy and has a portion that sticks out with nice straight sides, which slides into the hole in the plywood (I looped the camera strap around the top of the enlarger to keep it out of the way, but it would also catch the camera if it were somehow knocked off the stand). The height of the stand was adjusted so the neg would almost fill the frame, then the lens was focused. The manual focus aid in the X-T1 helps a lot for this — it will zoom in on the center of the frame and show red highlights when edges are in sharp focus, as seen below in the bad iphone photo of the camera’s LCD screen:
The room lights were shut off before shooting the actual photos, to eliminate any reflections off the film.
I tested the camera and lens combo by shooting several images of a couple negs from f/3.5 to f/22, and found that I got the sharpest images at f/3.5 to f/8. Surprisingly, this lens actually seems slightly sharper wide open at f3.5 than stopped down a stop or two. But to get a little bit of depth of field to help ensure the whole neg was in focus, even if it wasn’t completely flat, I shot them at f/8.
Here’s the lens I’m using:
It’s a Nikon Micro-Nikkor 55mm f/3.5 – a great macro lens with extremely little distortion. In these images of square negatives, there was absolutely no bowing of the edges of the images. When cropped square to the image, the edges were perfectly straight. I’m lucky that I just happened to have this lens already, so I only needed a cheap adapter to put it on the Fuji X-T1.
The camera was set to electronic shutter so there’d be no camera movement from the shutter, and set to ISO 200, auto shutter speed, and with a 2-second self-timer to eliminate camera shake from pressing the shutter button. Next time I’ll set the shutter speed manually so that all of the exposures on a roll are consistent, as that will make later Lightroom adjustments easier to apply through the whole roll.
The negs had just been dried after developing, so they were still very clean, so I didn’t even bother blowing dust off of them. The scans picked up a few dust spots, but not bad at all. I slid the negs through by hand, and had to spend a few second on each one making sure it was aligned straight in the viewfinder, and that I wasn’t cutting off any of the image. That’s where this process could really be improved — by building some kind of neg carrier that the negs could slide through and stay aligned in the viewfinder. Even so, it probably only took about 15 minutes to shoot the roll, from setting the camera height and focusing the first neg to shooting all twelve images. (EDIT: Now that I’ve done a few rolls this way, it’s even faster — I have the enlarger marked at the proper height, so setup is faster, and I can get through a roll in a few minutes)
Process updated: See NOTE at end of this post.
Then the negs were brought into Lightroom and adjusted. Here’s what they looked like when first imported to Lightroom:
In Lightroom there’s no easy way to invert the negs into positives (they should really add a simple checkbox in the tone curve panel to invert the image). You have to grab each end of the tone curve and pull the bottom end up to the top, and the top end down to the bottom to invert the image (if you can’t get this to work, click the button in the bottom-right of the Tone Curve box — this change it to a ‘point curve’ and you can move the very ends of the line).
So you change this:
Simple enough, but now all of your exposure sliders in Lightroom are reversed. Increasing the Exposure slider darkens the image; decreasing the Blacks slider actually increases the Whites. It’s a bit confusing. I did this in Lightroom because I wanted to work with the camera RAW image, thinking that would give me the best quality. But after some experimenting I’ve decided that the JPG images are just as good, so it’s easy to simply invert the images in Photoshop, then make all the normal adjustments in Lightroom. Next time I do this, I’ll quickly invert all the images in Photoshop before importing them into Lightroom. Process updated: See NOTE at end of post.
Another advantage that I discovered in shooting my own scans is that I can get the full frame with no cropping of the image. Here’s the first test image I shot, from an older roll of film. You can see the actual edges of the frame of the film:
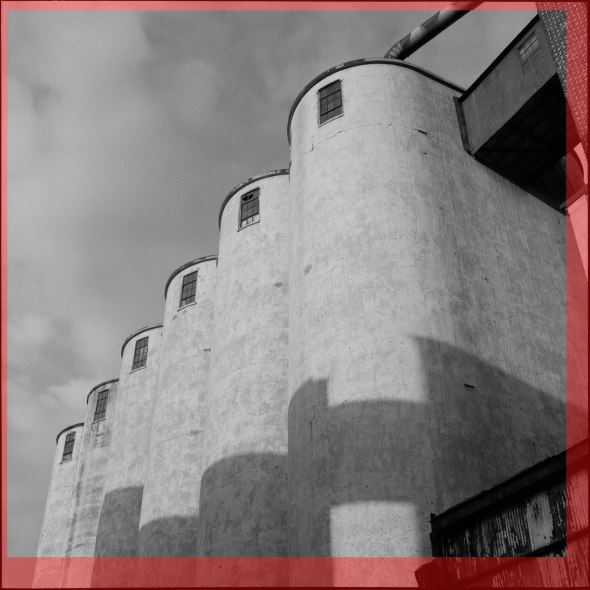
Below is a scan from a lab. You may notice that quite a bit of the image is cropped out:

And here is an overlay showing the scan that the lab did on top of my scan (tinted red). The red edges are the parts of the image that were cropped out of the lab scan. That’s a pretty big difference.
I’m looking forward to developing more film and experimenting more with this. Next step: build a neg carrier to slide the 120 film through. After that: Build a rig to slide 35mm negs through for the same kind of setup.
EDIT:
I’ve scanned more film using this setup and have changed just a couple things:
1) I’m setting my camera to record a B&W JPG instead of color to simplify it a little. I did some testing of B&W vs Color and JPG vs RAW, and found virtually no difference. The dynamic range is very low, so there’s no need to shoot raw.
Note on dynamic range: I’ve seen some online posts about camera-scanning, and people are concerned about the digital camera’s ability to capture the full dynamic range of the film. Here’s my take: Relax, it’s not an issue at all. The dynamic range of the scene was already captured and compressed in the film. When “scanning” the neg, the dynamic range you’re capturing is only the difference between the blackest part of the film and the brightness of your light pad. Unless your light pad is as bright as the sun, you’re not talking about much dynamic range here. I don’t get any clipping of highlights or shadows.
2) Before importing into Lightroom I do a quick inversion in Photoshop to turn the negs into positives. I created a Photoshop action ‘droplet‘, so all I have to do is drag a folder full of images onto the ‘droplet’ on my Mac, and they will all be opened in Photoshop, inverted and re-saved. It all works automatically and just takes a few seconds. Then when they’re imported into Lightroom I don’t have to mess with inverting the tone curve.
Update: I’ve now built a nice rig for 35mm neg scans, too.


While this is a very clever way to scan negatives there are a couple of easier ways to do it.
1) Buy a scanner. The price on these has dropped dramatically. I picked up an an Epson V500 on Ebay for $110 including postage. The newer model (V550) is available for $169 at various outlets (B&H, Amazon etc.). This includes automatic reversal of negatives (Color & B&W), scanning of prints and color correction. These models do 8 35mm negatives or slides and 4 2¼ x 2¼ at a time.
2) Get a three way level for your camera. B&H sells one for $22. With this gadget you could use your tripod.
Your solution is elegant but does require a bit of luck. Finding an Omega Enlarger at this price is a miracle. Look at the prices on Ebay. The Nikon macro lens worked, but as you pointed out, not all lens will work. Finally many of us (myself included) are either not very handy with or do not have access to tools.
Well, I certainly wouldn’t say that this method is for everyone. It makes sense for me because I enjoy building things. And I happened to have a good lens for it, the camera for it, etc. I have an Epson V500, but I’ve never been thrilled with the scans from it. Using this method I can get better images way faster — at least for black and white images.
Yes, a three-way-level would be great for someone who wants to try this with a tripod. I just want to have a setup that’s ready to set the camera on and shoot without having to level the camera every time I want to use it. The beauty of the copystand is that the camera will always be aligned with the base even if it’s not sitting on a level surface. I’ve done it before with a tripod and level, and it’s tedious and slow.
I have to disagree with eppaar’s first point for one reason: speed. I’ve been using a Canon 6D with a Canon 50mm macro lens and extension tube along with a PhotoSolve Extend-a-Slide (http://www.photosolve.com/main/product/xtendaslide/index.html). I’ve rescanned old 35mm B&W negs originally scanned with a Microtek ArtixScan 4000tf Scanner to compare. The camera scanner is as good as, if not better, than what I was getting with my dedicated film scanner. The best part is how crazy fast it is to copy negatives.
I agree. Speed and image quality both seem much better. Especially speed — takes forever to scan a roll of film on the flatbed. Thanks for that link to the xtendaslide — that’s really similar to what I was thinking of trying to build for 35mm negs. I remember seeing devices like that way back before digital photography, but I hadn’t seen anything recently. With that device is it kind of tedious to move the film from one image to the next, or is it quick?
Oh, and I think the one big advantage that scanners have is with color images. I don’t know of any really easy, fast way to color-correct a color neg. It can be done, but all the methods I’ve seen are a little time-consuming. Whereas scanners have the color-correction built into the scanning software — so the scan might be slow, but it will come out automatically inverted and color-corrected.
These are really good “scans.” I wonder how hard it would be to make a product out of this idea for sale. BYOC (bring your own camera) but insert it here, kind of thing.
Good question. Probably not many people who would want a 120 version, but maybe 35mm. Check out the link to the 35mm copying tube in the comment above.
Really nice! All you need now is a motorized transport to move your film for you, and sync that up to your camera’s shutter 🙂
I’ve heard that Color Perfect, which is a plugin for Photoshop, does really well with inverting raw scans, plus they have really accurate profiles for most films. The only other suggestion I’d make is that I’d think it would be better to suspend the camera from the body, not the lens, even though I’ll admit it’s worked for you.
Thanks Joe. Yeah, it’s sort of crazy to balance the camera on the lens like that, but with this particular lens and camera it works fine. I’ll probably work on a different mount that’s more solid and uses the camera’s tripod mount. This version was quick and easy though.
I’ll have to check out Color Perfect if I want to try color.
Funny you mention the motor advance because my teenage son wanted to build one for 35mm film last year for a science project for class. His teacher was really excited about using an Arduino to control stepper motors that would precisely advance the film and trigger the camera. It proved too difficult, so he designed something kind of similar to that xtendaslide thing in the link above, but with a track that you could slide strips of film through. He built a prototype but not a great working version, because the school’s 3D printer wasn’t working.
A bit late to the party, but I use a similar-but-different technique that simplifies things quite a bit.
I use a long metal lens hood as a spacer and then I put the camera directly on top of the film. So the sequence is: camera > macro lens > metal lens hood > film (held in place with painter / paper tape, that leaves no residue and costs just 1€ per roll) > light table.
This way the camera will always be perfectly parallel to the film, and the hood as a nice bonus keeps the reflections out from the film surface.
And like you pointed out I shoot multiple pictures for every frame and then I stitch them in PS or LR.
You can see more details here:
and here:
Lastly, I messed around with the Color Perfect plugin, but while nice is seriously too complex for my taste. So now I use this technique (the article speaks about Photoshop, but now that Lightroom supports curves subdivided by color channels I do the same kind of corrections in there):
With not many good labs left, we film shooters have to help each other! 🙂
Thanks, Addicted2Light!
I had found your blog posts before I tried this, and you were part of my inspiration for making this rig. I appreciate the info and feedback. I haven’t tried color yet, but I think I’ll give it a go soon.
Thanks.
Rick
Should you decide to develop color by yourself, be sure to take a look at one of my posts regarding stand development in C41. Controlling the temperature is the most tedious task, and stand developing you avoid this annoying step altogether while still getting great results.
Have fun!